Research Users Training Material
6.3 Personal Workspace - U Drive
6.4 Saving files to the desktop
1. Introduction
Monash Secure eResearch Platform (SeRP) is a secure environment for sharing research data for collaboration and analysis, within the control and governance of the data custodian. Monash SeRP allows the Data custodian or the delegated project manager (Data Custodian) to have visibility and control over how their data is being used by other approved researchers.
2. Key Features & Benefits
2.1 Features & Benefits
-
Secure remote access to your research data.
-
Fully controlled environment
-
Regularly updated software packages to assist you in your data analysis
-
Accessible using most modern web browsers and mobile devices
-
Hosted on NeCTAR Research Cloud (Local Monash Instance)
-
Dedicated Support Website
2.2 Available Applications
Applications are delivered dynamically and are assigned to the user upon login.
Currently, the following applications are provided:
-
SPSS
-
Stata
-
SAS
-
R Studio
-
MatLab
-
Notepad++
-
Python
-
Microsoft Office applications
Additional applications can be installed upon request (subject to licencing).
Please submit any requests to serp-support@monash.edu
3. Terms of Use
Use of the Monash SeRP is subject to Monash University’s Information Technology Acceptable Use Policy and Information Technology Acceptable Use Procedure. Found here.
If you have any queries, please contact the Monash SeRP Helpdesk: serp-support@monash.edu
4. Getting Started
4.1 Account Activation
To activate your Monash account, follow the steps in the link below. We recommend that you read all the instructions in this section before beginning these steps:
https://monash.edu/esolutions/accounts-passwords/activate
Note: Monash accounts require a strong password. For guidance on creating a strong password, see article https://mon.clients.squiz.net/esolutions-site/accounts-passwords/strong-passwords
Your Multi-Factor Authentication options:
If you have a smartphone, you can use either the Okta Verify app (recommended) or Google Authenticator for MFA. If you don’t have a smartphone, or don’t wish to use your smartphone for MFA, you can request a USB device (YubiKey or a U2F). You can also use your own U2F security key.
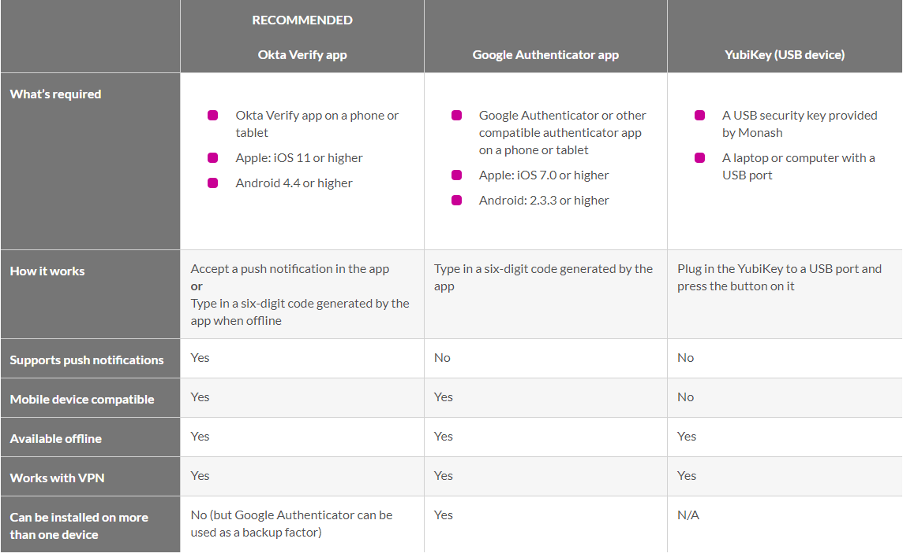
For further information on Multi-Factor Authentication, see
https://mon.clients.squiz.net/esolutions-site/accounts-passwords/multi-factor-authentication
After successful activation, if you select “continue”, a login screen will appear. It is not necessary to login at this point, as Monash SeRP is accessed from a Virtual Private Network (VPN) and a secure portal, and these steps are outlined below. However, if you wish to view your Monash account and access your Monash email, use your Monash ID, e.g. ext-jsmith to login at this point. You do not need to use the full email address, eg. ext-jsmith@monash.edu
Troubleshooting
If you experience issues activating your account, contact Monash SeRP
Support Desk:
serp-support@monash.edu
4.2 Monash VPN
A VPN is a virtual private network which allows you to access Monash services. A VPN connection is compulsory while accessing the SeRP environment. Monash utilises a VPN client called ‘CISCO AnyConnect’.
Download CISCO AnyConnect using the instructions available at https://vpn.monash.edu
Detailed guidance about Cisco AnyConnect and the Monash Virtual Private Network (VPN) can be found at https://www.monash.edu/esolutions/network/vpn
4.3 Roles & Permission Levels
During account configuration, you will be allocated a specific role which will provide certain permission levels for accessing data.
These roles are categorised as follows:
Project Lead - Access to S3 Project Management Portal and Read/Write access to proejct data
Project Manager - Read/Write Access to project data
Analyst - Read Only access to project data
4.4 Terminology
Analyst - Refers to a specific role within the Security Module. See Data Custodian permissions guide for more information.
Data Custodian - Designated data owner of a specified project, set of sub-projects or dataset. Responsible for approving data access and data management.
Data Portal - A publicly accessible portal that contains information about data access and data catalogue information.
End User - The ultimate individual end users of the Software (usually equivalant to ‘Analyst’ role)
End User Terms - The terms and conditions that each End User must abide to when using the Software which shall be substantially in the form set out in the End User Agreement provided to the Sub Licensee.
eSolutions - Provides underlying IT support and access Monash IT systems for Monash Helix and Monash eResearch Centre.
Flavours - Description for range of Virtual Machine compute options (Small, Medium, Large, etc).
GPU - Graphics Processing Unit. Refers to GPU enabled Virtual Machines.
Helix - Provides operational support for Monash SeRP Sub-Licensees, Data Custodians, End-Users and research projects.
HPC - High Performance Computing
MeRC - Monash eResearch Centre provides Monash SeRP Infrastructure support. Monash - Monash University licences and provides support services for the SeRP software to other institutions within Australia. . Monash SeRP - Monash Secure eResearch Platform (SeRP) is a secure environment for sharing research data for collaboration and analysis, within the control and governance of the data custodian. Monash SeRP Infrastructure - The underlying hardware and technology running and supporting the Monash SeRP.
Nectar - Research Cloud Storage infrastructure utilised by Monash SeRP
Packages - Refers to additional software add-ons that can be installed to accompany certain software. ie. STATA, R, Anaconda.
Project Lead - Refers to a specific role within the Security Module. See Data Custodian permissions guide for more information.
Project Manager - Refers to a specific role within the Security Module. See Data Custodian permissions guide for more information.
Research Data Storage (RDS) - Secure Research Data Storage infrastructure supporting the safe storage of data within Monash SeRP.
Security 3 (S3) Portal - Monash SeRP administration portal. Available for system administrators and data custodians to upload datasets and add user permissions.
Sub Licensee - An institution or public body which enters into an Sub-Licence Agreement to license the Software (Monash SeRP).
Swansea / Swansea University - Swansea University has developed the Secure eResearch Platform (SeRP) technology.
Virtual Desktop Infrastructure (VDI) - Virtual Machines available for analysis of data.
Virtual Machine - Virtual environment created on the Nectar cloud. Currently Windows Server virtual machines are available with varying compute power.
5. Project Governence
5.1 Adding Users to a Project
It is the responsibility of the Project Lead to approve and request adding users to a project. Please contact your project lead if you require adding a user to a project or require access to a project.
5.2 Ethics and Privacy
The responsible conduct of research includes within its scope the appropriate generation, collection, access, use, analysis, disclosure, storage, retention, disposal, sharing and re-use of data and information.
All researchers should comply with the Australian Code for the Responsible Conduct of Research, 2018 https://www.nhmrc.gov.au/about-us/publications/australian-code-responsible-conduct-research-2018
5.3 Data Security
Researchers must exercise care in handling confidential or other sensitive information used in or arising from a research project. Research data and information to which obligations of confidentiality or other sensitivities may apply commonly fall into one of the following categories:
• data or information that is commercial-in-confidence or that is inherently confidential and which has been provided in confidence (e.g. secret and sacred religious or cultural practices, or information on the location of vulnerable species)
• sensitive data or information subject to privacy legislation (e.g. identifiable human medical/ health and personal data or information)
• data or information subject to classification regimes and other controls (e.g. national security information, police records or information and primary materials subject to export controls).
5.4 Publication Acknowledgements
Accountability for public spending on research is a key driver behind the impact agenda. Demonstrating the impact of research can raise our profile locally, nationally, and internationally.
The Australian Government and its research funding bodies, the Australian Research Data Commons (ARDC), the Australian Research Council (ARC) and National Health and Medical Research Council (NHMRC), require researchers to characterise the reach and significance of their research impact.
Researchers who use data from the Monash SeRP in any presentations, academic journals or other publications must acknowledge Monash SeRP using the following wording:
“This work is supported by Monash University through the Monash eResearch Centre and Helix, utilising the University hosted Secure eResearch Platform (Monash SeRP) on the Nectar Research Cloud. The Nectar Research Cloud is a Collaborative Australian research platform supported by the National Collaborative Research Infrastructure Strategy.”
Copies of publications (abstracts, papers and posters etc) using data from Monash SeRP must be sent to Monash SeRP on acceptance for publication. Publications should be submitted to: serp-support@monash.edu
Researchers who use data from the Monash SeRP should also provide a PURE ID number for each unique research project.
5.5 Working With Senstive Data
All researchers should comply with the Australian Code for the Responsible Conduct of Research, 2018 https://www.nhmrc.gov.au/about-us/publications/australian-code-responsible-conduct-research-2018
Monash SeRP is committed to the integrity and safeguarding of personal data and researchers should take all reasonable steps to ensure that the data is:
• protected from misuse, loss, unauthorised access, modification or disclosure; and • managed in accordance with Monash University’s Recordkeeping policy and the • Recordkeeping: Retention and Disposal of University Records procedures (Australia only). • and if appicable, your own institution policies.
6. Analytical Environment
6.1 Logging into Monash SeRP
Requirements
-
Internet Browser - Monash SeRP can be accessed through any modern internet browser. We recommend Microsoft Edge or Google Chrome.
-
Your Monash user account must be activated, see “Activating your account” section.
Steps
1. Log in to the Monash VPN using your Monash ID (username) and password
Open the CISCO AnyConnect application, then click Connect
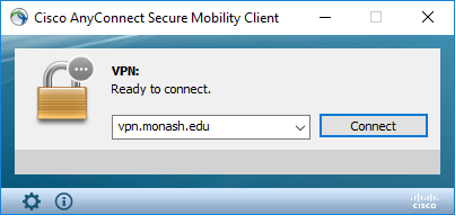
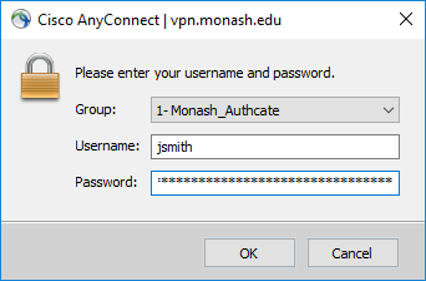
2. Login with your Monash username, not your email address.
Your username will be similar to: jsmith, jsmi0001 or ext-jsmith.
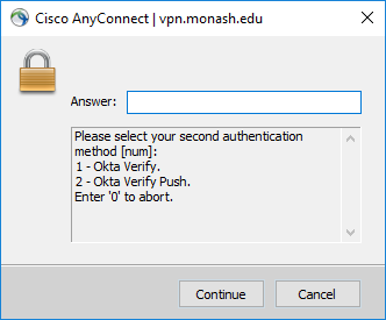
3. You will be prompted to authenticate using multifactor authentication (MFA).
Select either Option 1 or Option 2.
Option 1: Enter verification code from your Okta App, then click OK.
Option 2: Approve push notification on your Okta App.
4. Click Accept to complete your login to the VPN
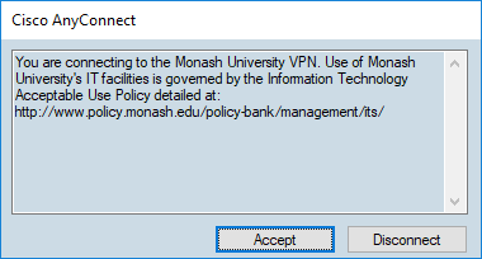
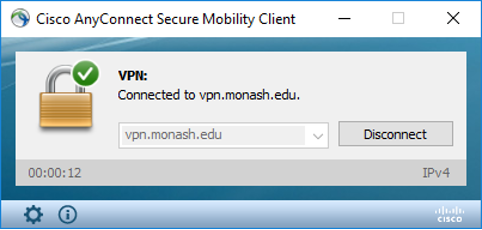
5. Open a web browser and go to the Monash SeRP web portal
https://serp-web.erc.monash.edu/
6. You will be directed to enter your Monash ID and password to see the Monash SeRP Launch Portal where you will see your available project(s) listed and several options:
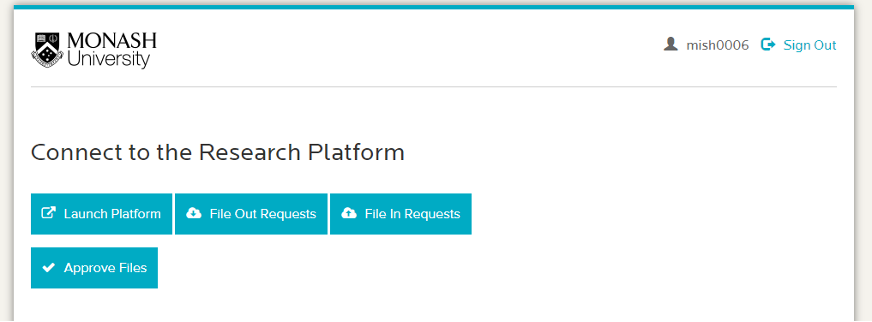
7. Click Launch Platform
8. You will be redirected to the Monash Okta login page.
Please enter your Monash email address (ie. ext-jsmith@monash.edu) and password and follow authentication prompts on your screen and secondary smart device.
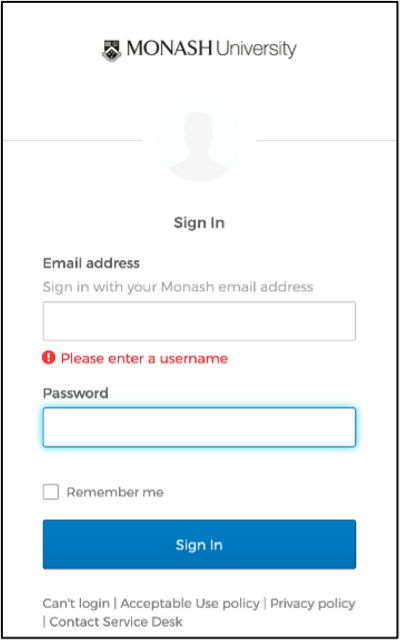
9. A pool of available Virtual Machines will be listed.
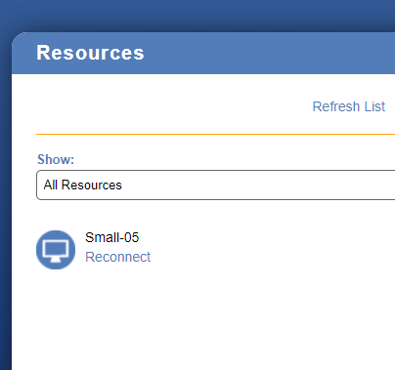
Click Connect on any available machine to start the remote connection

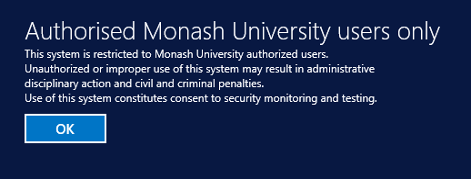
10. Click OK
11. Once you've selected a Virtual Machine you will be prompted to re-enter your Monash ID and password.
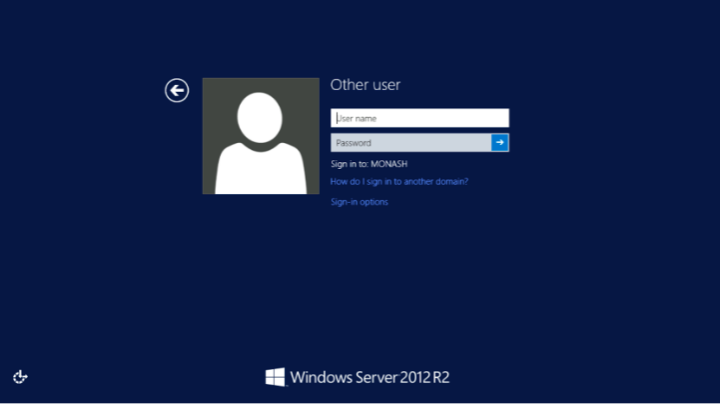
12. Congratulations, you are now logged in!
Upon first time log in, it may take a minute to load your personal desktop.
To sign-out of the environment, click the Windows button on the lower left of the screen. This will Load a menu screen, click on your name in top right corner of screen and click sign-out.
6.2 Project Data - P Drive
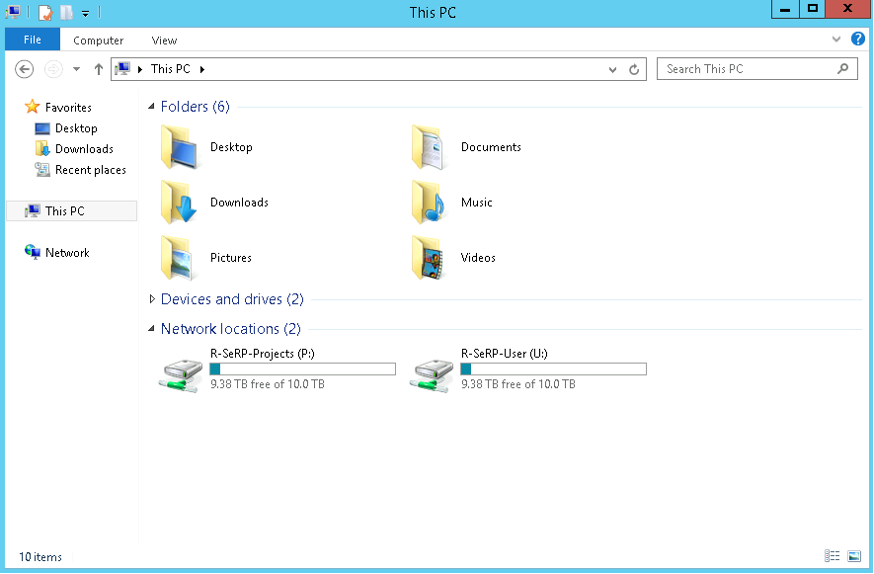
1. To access your research data folders, you must be logged into the Monash SeRP Analytical Environment and click on the File Explorer icon in the bottom left of screen.

2. The project data is available on the P: drive.
Accessing the P drive will show you a list of available project folders. You will only be able to see the project folders that you have been approved to access.
6.3 Personal Workspace - U Drive
1. Your own reference documents, scripts or research outputs should be saved to the U drive
2. You may also save data to the P drive, but this will be dependent on the permissions you have been allocated for the project. If you are unsure where you should save data, please check with your Data Custodian or Project Lead.
3. It is important that you do not save data to any of the ‘My documents’ folder or desktop. There is no guarantee the same machine portal will be available to you the next time you log in. The ‘My Documents’ folder is a component of a user’s profile and is unique to each user.
6.4 Saving files to the desktop
1. It is recommended that you do not save any files to the desktop of the analytical machine.
2. Any files saved to the desktop will be saved only to the users profile on that particular machine. The ‘desktop’ folder is a component of a user’s profile and is unique to each user.
3. This is not ideal as the user cannot be guaranteed to access the same machine again in future.
4. All files should be saved to either the P drive or U drive.
6.5 Analysis Applications
If you require additional packages to be installed for any of the below applications, please submit your request to serp-support@monash.edu. All requests should be submitted by the delegated Data Custodian or Project Lead.
STATA
- STATA is a general-purpose statistical software package for data
manipulation, visualization, statistics, and automated reporting. STATA
is available with a large list of preinstalled packages. A full list is
available
here.
To check within STATA, use the command: -ado-
R / R Studio
- R is a programming language and free software environment for statistical computing and graphics supported by the R Core Team and the R Foundation for Statistical Computing. It is widely used among statisticians and researchers for developing statistical software and data analysis
- R and R Studio are available with a large list of preinstalled packages. A full list is available here.
- To check within R, use the command: installed.packages()
Anaconda / Python
- Anaconda is a distribution of the Python and R programming languages for scientific computing, that aims to simplify package management and deployment.
- Anaconda is available with a base environment with preinstalled packages. A full list is available here.
- For detailed instructions on creating and managing Anaconda environments, please see here.
Anaconda / Jupyter
- The Jupyter Notebook application allows you to create and edit documents that display the input and output of a Python or R language script. Once saved, you can share these files with others.
- For the official Jupyter Notebook user instructions, see here.
- Before using Jupyter, you will be required to set the default browser to MS Edge.
1. Launch Anaconda Prompt Command Prompt via the Start Menu.
2. Type the command “jupyter notebook –generate-config”
3. Locate the generated configuration file in the path “C:\Users\XXXX.jupyter\jupyter_notebook_config.py” and open it with notepad/any text editor.
4. Modify #c.NotebookApp.browser to c.NotebookApp.browser = ‘C:/Program Files (x86)/Microsoft/Edge/Application/msedge.exe %s’
5. Save the file and close it, then stop the process at the command prompt (Ctrl + c)
6. Now, start the tool typing jupyter notebook in the Anaconda Prompt.
Note: Don’t forget uncomment (delete the hashtag symbol #) in step four (4). Next time you execute the jupyter-notebook command, it will use the set browser.
- You will also be required to configure the correct drive location. To change the drive location, open the ‘Anaconda Prompt (Anaconda3)’ application via the start menu. At the command prompt, enter the below command line.
jupyter notebook –notebook-dir=p:/ (or change to u drive if required)
SPSS
- SPSS v27 is available on Monash SeRP
- R Plug-In has been installed
- Python Plug-In has been installed
- Propensity Score Matching bundle has been installed
When opening SPSS, please ensure R and Python locations have been set correctly. Once setup correct, you will be able to use SPSS with Python/R as normal.
SPSS - Python Setup
1. Go to Edit > Options > File Locations
2. Ensure Python 2.7 location is set to C:\ProgramFiles\Python27 and Python 3 Location is set to Installed with IBM SPSS Statistics

SPSS - R Setup
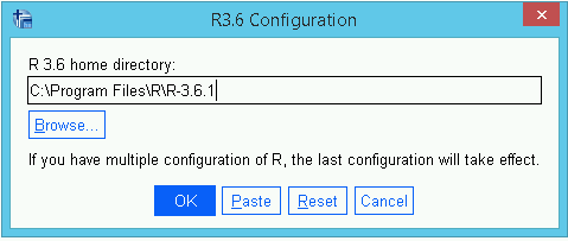
1. Go to Extensions > R3.6 Configuration
2. Ensure R 3.6 home directory is set to C:\ProgramFiles\R\R-3.6.1\
SPSS Summary
For SPSS v27 the Propensity Score Matching option is available under Data > Propensity Score Matching
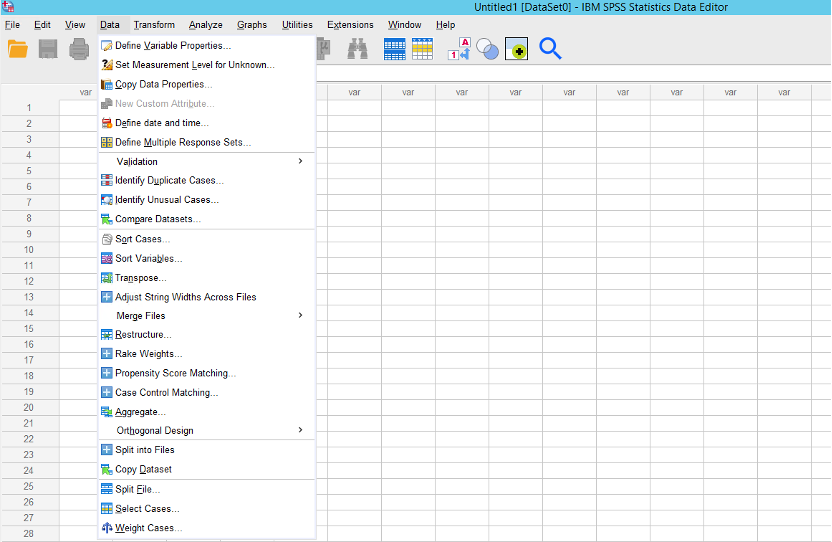
FUZZY is also available.

6.6 File in Process
This process should be used by the Data Custodian to ingress project files such as datasets, data dictionaries, scripts and other supporting project documentation.
End-Users can import supporting project documentation and scripts for data analysis.
1. To import a file into the SeRP environment, load the SeRP user portal:
https://serp-web.erc.monash.edu/
Reminder: SeRP access is only available via Monash VPN. For detailed log in instructions, see here.
2. Once you have accessed the SeRP portal, click File In Requests icon as show below.

3. You can now drag and drop your file in requests into the Files area.
Click Upload Files when finished. Files will be automatically approved.

4. To retrieve your file from within the SeRP environment, go back to the main portal page by clicking on the Monash University logo.
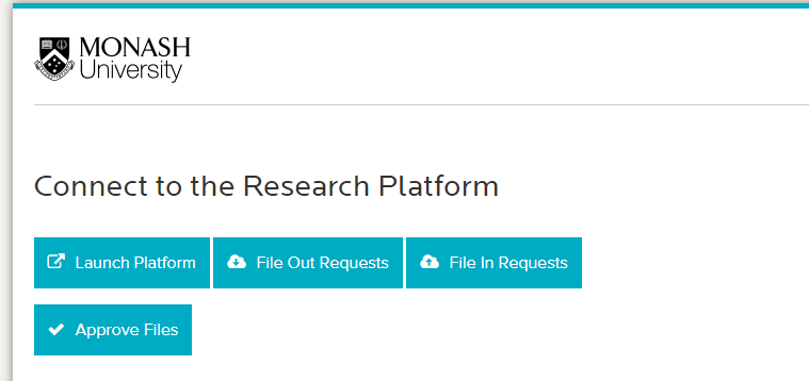
Click Launch Platform, then connect to a virtual machine.
5. Once connected and the virtual environment has loaded, select the desktop icon SeRP Egress

You will be prompted for your log in details, please use your Monash ID and password.
6. Click Retrieve Files In
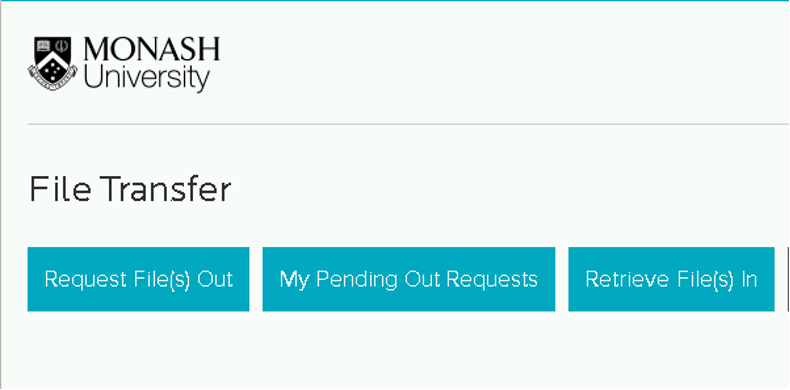
7. A list will display of all available file uploads. Select the eye icon to view your file.

8. Click the download icon to download your file within the SeRP environment.

9. Your file(s) has now been imported into the SeRP environment and will be available on the U: Drive.
10. Transfer the files from the U: drive to the P: drive to allow all appropriate project researchers to access the data.
6.7 File In Process (Large Datasets)
1. There is no file size limit for data ingress using the File In Process described above.
2. Alternative methods are available using SFTP or datasets can be uploaded to an SQL Database.
3. Please contact serp-support@monash.edu for assistance an advice using these alternate methods.
6.8 File Out Process
Approved files are permitted out of the SeRP analytical environment based on an approval process. This may include SQL queries, tool scripts, tool outputs, frequency counts, statistical outputs and project reports. All of these types of files are subject to the SeRP and project data policies.
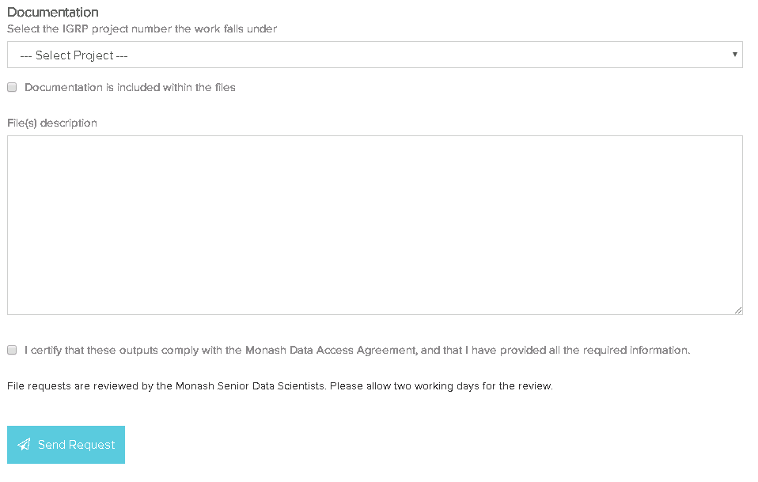
To request approval for files out, please submit them for review using this form. Drag and drop the files onto the files target area and complete the documentation section.
Documentation is required for the reviewer to understand and evaluate the files. This documentation should include as a minimum:
- Source data used
- An explanation of what is included in the file (e.g. descriptive labels for any table columns, figures, etc.)
- An explanation of why small numbers (< 5 individuals) are present in your file as these can be a disclosure risk. If you do require small numbers to be included in your file then an explanation of why you consider this not to be a disclosure risk must be included in your documentation.
This can be provided in the description when submitting the request, but it is often easier to include it in the file(s) or as an additional documentation file.
Please ensure the documentation is sufficient for the reviewer to assess the files. Failure to include adequate and accurate information may result in delays and/or rejection of your request.
The project relevant to the request must be selected. If the request is not related to a project, select N/A and explain the reason in the documentation. This situation is rare, do not do this for project related files. If the appropriate project does not appear, please contact serp-support@monash.edu.
File requests are reviewed by the appropriate project team. Please allow at least two working days for the review.
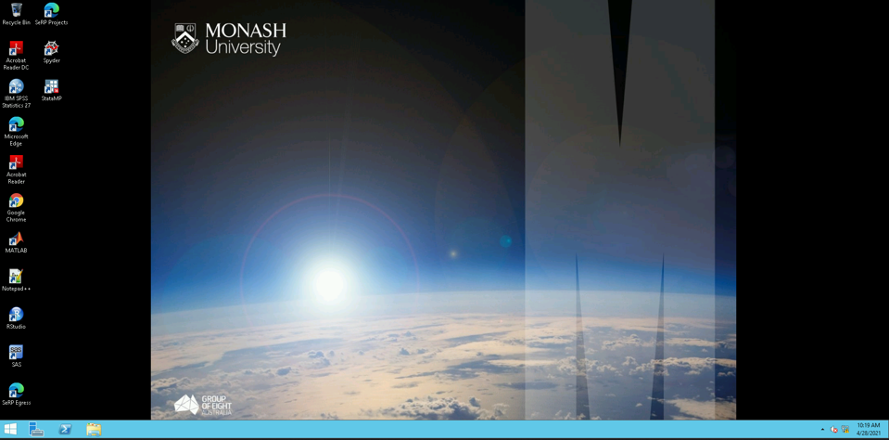
1. File Out requests are submitted from within the Monash SeRP virtual desktop environment, using the SeRP Egress desktop shortcut.
Please see the user guide, Logging in to Monash SeRP user guide for detailed steps accessing the Monash SeRP analytical environment.
2. Once you have accessed the Monash SeRP virtual desktop environment, double-click the SeRP Egress desktop shortcut.

You will be prompted for your log in details again, please use your Monash ID and password.
3. Once the SeRP Egress Portal has loaded, click Request File(s) Out

4. Drop your file(s) into the relevant area and complete the form questions. Then click Send Request.

5. Please allow two working days for the review process. When the review has been completed, you will be sent another email notification containing instructions on how to retrieve the file(s).
If you have not received an email with instructions on how to retrieve your file(s) please contact your project co-ordinator or data custodian.
The following steps are to be completed once your File Out Request has been approved for retrieval from the Monash SeRP environment.
6. Navigate to the Monash SeRP User Portal at https://serp-web.erc.monash.edu/ (do not select launch platform).
7. Select File Out Requests

8. A list of previous File Out requests will be displayed. Click the eye icon to view your approved file.

9. Click the download icon to download your approved file. The file will now be saved to your local computer.
